St. Charles Trolley Car

I said one of my goals was to get a good picture of a New Orleans Trolley Car.  Here it is.

St. Charles Trolley

I am really happy with the way it came out.  While on the train coming home, I was watching a video and there was a small commercial for Topaz Impressions software plugin. It transforms images to make them look like impressionist paintings.  It turns out there are two similar packages, and I downloaded both and played with them. Here is what I got.

2014-12-08 at 19-04-53

It creates an interesting image, but it is almost insulting to real impressionist artists. To actually create impressionist art takes a great deal of skill and work. So, I am somewhat torn about this/


Fine Art Prints

I have been intrigued by the idea of fine art prints.  A CreativeLive seminar with Doug Landreth explored how he goes about making them.  It was interesting, but there was not nearly enough explanation. In Photoshop, he overlays images with layers that he manipulates into patterns that add barely visible elements and textures to the image.  The result is quite good.

As a first step in looking at that, I took some of the pictures I took last week on Highway 6, and transformed them into Black and White.

SONY DSC

It turns out there are a variety of ways of producing Black and White images.  One is simply to reduce the color saturation of the image.  There are other “effects” in Aperture.  They somehow use selective filters in the operation. For these, the one that I liked the most used a Red filter.  I am not sure what that really means, but it had the effect of darkening areas of the sky until they were almost black.

SONY DSC

It is almost like using a polarizing filter. The rest seemed to exaggerate the starkness of the image.

SONY DSC

Looking at these calls to mind scenes from the old John Ford Westerns.

SONY DSC

Vision

I just came back upon Don Giannatti’s “Project 52” web site.  I had seen the site several months ago, but it slipped from my memory.  I have been a member of the flickr group for a long time, but, I can’t remember the last time I actually visited the group page.  On this site, there is a weekly photography assignment. The assignments for this year start on February 1.  So, I looked at the 2012 assignments.

The first assignment is to create a Vision Statement.  This is basically a statement describing why it is that I take pictures.  As described on the web site, “Tell us with a single paragraph what you want to be able to do with your images. Tell us what you do without telling us you are a photographer. Accompany that message with a single image taken around your home.”

To me, the reason I enjoy photography is it differs from other modes of expression, and there is something that is transcendently stimulating when I see a really great image I have taken. In 2012, my Aperture Library has over 7700 images.  Every once in a while, as the image would come up on the screen, there was a moment of awe.  Kind of, “Oh boy.  That is good!”

It is becoming easier to take technically perfect images – those with proper exposure, composition, lighting, whatever.  I can look at those and think, “That’s a good image.”  But there is the added, intangible element that is included in an image that is really great.  I take photographs because I enjoy that feeling of producing a picture that is really great.

Now, what kind of image around the house can I make that illustrates that?

Iowa Snow

SONY DSC
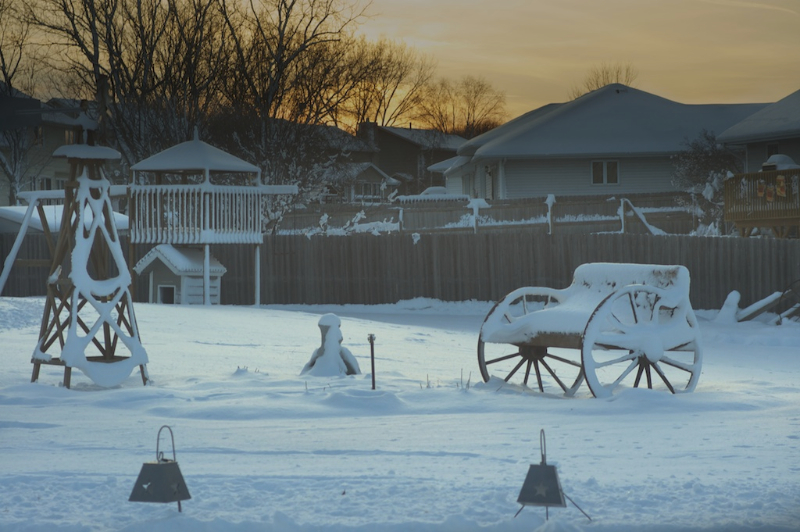
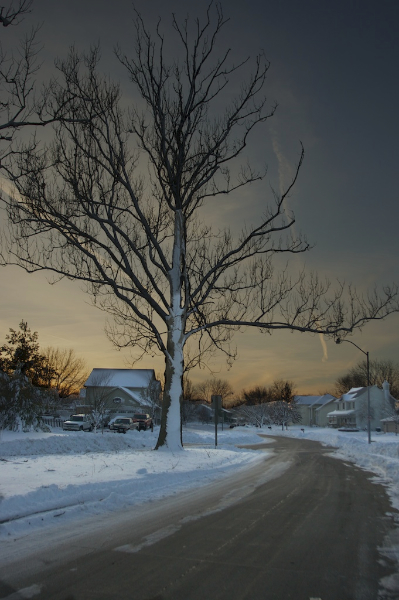
We went to Des Moines for Christmas.  They got about a foot of snow a few days before we got there, and I really thought it would less evident.  I didn’t think it would be gone, but the snow still adhered to trees and things more than I expected. That allowed me to get some good pics.

SONY DSC

OK. now full disclosure:  Both of these are after some serious photoshop manipulations.  For the first one, I created two layers.  The exposure on the bottom layer was about -2, and the exposure on the top layer was about +1.5.  I then masked the top layer and brushed out everything above the buildings.  For the second picture, I did a similar thing, only I made a gradient mask for the top layer going through about the center of the picture.

PhotoJunction

I haven’t posted in a few days.  Cindy is finishing the edits for the wedding I shot with her three weeks ago.  Once she is done, I can post my images here.

We have been discussing an album for the couple.  I have used Aperture for other books.  The problem was there is no way of exporting the compiled pages except as pdf files.  So, you are limited to using Apple’s vendors to produce the book. Their prices are reasonable, but there is not a whole lot of selection.  Now, I see Apple has allowed a few high end vendors to produce plug ins that allow for the ordering of really high end books.

In spite of that, it appears there is much better flexibility by producing a book outside of Aperture.  I have been trying to learn a program called PhotoJunction that interacts with a variety of vendors to allow for the design and production of books.  So, I have spent some time the last couple of days trying to learn this program.  For the most part, it is intuitive and utilizes lots of drag and drop procedures.

Additionally, I am looking at a web site called albumexposure that allows users to upload compiled albums and then allows the customer to look at them and proof them.  After all changes have been made, then the album can be ordered from a variety of vendors directly from this web site.

I have found out that there are essentially two different categories of such albums.  The “press” books are produced by using one image per page.  (The images can be multiple pictures like the one above.) These are then printed on book/magazine quality paper.  The resulting book is like a standard coffee table book.  The process is relatively cheap, and the price of the books that are produced depends on covers and linings, but is relatively inexpensive.

The “matted” books print the images on photographic paper.  Although the templates allow for multiple images on the same page, apparently the production process will not allow for any overlap of the images. So, in my page above, the four pictures would be printed on the page, but not the background image.  The resulting photographic print is then adhered to a mat, making the pages very much thicker.  This is kind of like an old style scrapbook, but one of extremely high quality. In looking at various vendors for these, it would be easy to spend $500 on a book.  In one case,  the cost of the book was $6500!

Focus Points

There is a feature in Aperture called “Show Focus Points” that creates an invisible overlay on the image and then indicates what focus point(s) was/were used to create the picture.  This has a certain potential for images that might not be as sharp as you would like.  They may not be sharp because the camera was not really focusing on what you thought it was, and this feature will let you see that.

Unfortunately, it does not appear to work with my cameras. I didn’t know whether Aperture just could not obtain the data or whether the data were not collected by the camera.  I posted to the flickr group, and found that the data really are recorded, but, apparently Aperture does not recognize them.  There is a program that can be run from inside Terminal that can access all the data.  The program is called exiftool.  The problem is, inside terminal, you must do it one image at a time.  Even at that, when I run it, I can’t find the focus point.  I can only find the focus mode.

Aperture Inspector

There is an application called Aperture Inspector that allows you to obtain a variety of information about your equipment use for the pictures in an Aperture Library.  When you open it, you link it to an Aperture library.  You can set a specific date range.  It tells you what camera bodies you used, what lenses you used, if they are zoom lenses, what focal lengths were used, what apertures were used, what shutter speeds were used, and what iso settings were used. There is also information about filters.